Building Winter Shelters
Courtesy of Alley Cat Advocates
Building a winter shelter for your outdoor cats can be both simple and inexpensive.
Two of the more popular styles are:
- Styrofoam bins, such as used to ship perishable food and medical supplies.
- Rubbermaid™ plastic storage bins with removable lids. It’s important the brand is Rubbermaid™; otherwise, the plastic walls may crack in cold temperatures.
When constructing a shelter, here are a few basic ideas to keep in mind.
All good shelter designs share two qualities:
- Strong insulation – needed to trap body heat, which turns the cats into little radiators. Use straw, not hay or blankets.
- Minimal air space – a smaller interior area means that less heat is needed to keep the occupants warm.
Shelter size is very important.
- Smaller shelters can be heated by only one or two cats. Larger shelters with only one or two cats inside will remain cold.
- Two smaller shelters are better than one large one.
- Don’t underestimate the number of cats in your area. You may only see one or two, but there are probably more. Try to provide more shelter space than you can imagine needing.
The placement of shelters is important in keeping cats safe from predators.
- If dogs are a threat, place your shelter behind a fence where the dogs can’t get in.
- Have the entrance face a wall so only cats can get in and out.
- All shelters and feeding stations should be out of sight, no matter how friendly the area may appear.
Don’t place the shelter directly on the cold ground.
Use two 2x4s or other materials to raise it off the ground and place straw underneath. This makes it easier for the cats to warm the inside with their body heat.
Make the door as small as possible.
Cats need an opening of only about five-and-a-half or six inches in diameter, or the width of their whiskers.
- A small door discourages larger, bolder animals, such as raccoons, from entering.
- A smaller opening keeps in more heat.
- If there is a need for an escape door, do not cut holes directly across from each other, as this creates a draft.
Locate the door several inches above the ground level.
- Rain won’t splash up through an above-the-ground door.
- Snow is less likely to trap the cats by blocking an above-the-ground door.
Creating extra protection:
An awning that covers the opening, made from roll plastic or heavy plastic garbage bags, provides more insulation, helps keep the rain and wind from entering the shelter, and makes the cats feel safer.
Preventing dampness:
Raising the rear of the shelter slightly higher than the front helps to keep rain from pooling inside and snow from piling up on the roof.
- A small hole drilled in the side or bottom of the shelter allows rainwater to drain out.
- A slanted roof might also discourage predators from sitting on the roof to stalk.
Lightweight shelters definitely need to be secured against the wind.
- Put a couple of five- to 10-pound flat barbell weights on the floor of the shelter under the bedding.
- Put heavy, flat rocks or pavers/bricks on the lid/top.
- Place two shelters with the doorways facing each other and put a large board on top of both shelters – this weighs the shelters down and provides a protected entryway.
Insulating materials inside the shelter will increase the comfort and warmth of the cats.
- Only insulating materials which the cats can burrow into should be used.
- Blankets, towels, flat newspapers, etc., retain wetness and should not be used. They absorb body heat and will actually make the cat colder.
- Straw is a good insulating material to use. Straw is better than hay because it can absorb more moisture and is less prone to mold or rot.
- Insulation materials should only be used if the shelter can be periodically checked to see if they have gotten damp or too dirty and need to be replaced.
- Additionally, don’t place water bowls inside the shelter because they may get turned over.
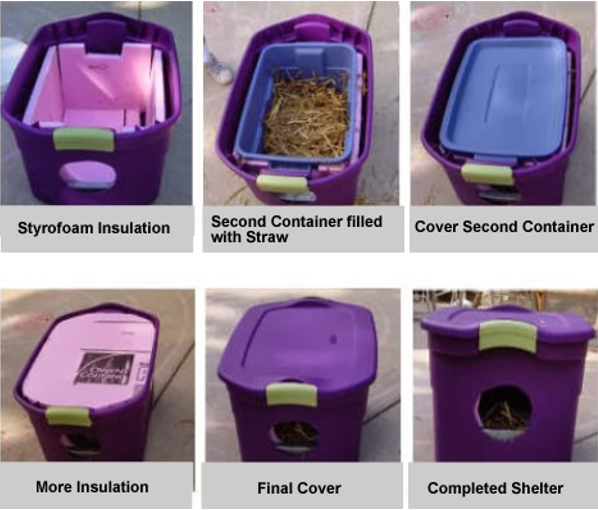
One of our favorite designs uses two Rubbermaid™ storage bins with removable lids.
Again, it’s important the brand is Rubbermaid™; otherwise, the plastic walls may crack in frigid temperatures. Also, an earth-tone bin blends in best with the environment, making it aesthetically pleasing to you and your neighbors and more natural in appearance to the cats. You’ll also need an eight-foot by two-foot sheet of one-inch thick hard Styrofoam, a yardstick, box cutter, and straw for insulation.
To assemble:
- Cut a doorway six inches by six inches in one of the long sides of the bin towards the corner. Cut the opening so that the bottom of the doorway is several inches above the ground to prevent flooding.
- Line the floor of the bin with a piece of Styrofoam, using the yardstick and box cutter to cut the piece. It doesn’t have to be an exact fit, but the closer the better.
- In a similar fashion, line each of the four interior walls of the bin with a piece of the Styrofoam. Again, perfect cuts are not necessary. Leave a cap of three inches between the top of these Styrofoam “wall pieces” and the upper lip of the bin.
- Cut out a doorway in the Styrofoam interior wall where the doorway has already been cut out in the storage bin.
- Measure the length and width of the interior space and place a second, smaller-size bin into the open interior. This bin should fit as snugly as possible against the Styrofoam wall pieces. Cut a doorway into this bin where the doorways have been cut into the Styrofoam and outer bin.
- Stuff the bottom of the interior bin with straw or other insulating material (no blankets or towels!) to provide both insulation and a comfortable spot to lie down.
- Cut out a Styrofoam “roof” to rest on top of the Styrofoam wall pieces.
- Cover the bin with its lid.
This shelter is easy to clean by taking off the lid and the roof. It is lightweight and may need to be weighed down. A flap over the door way is optional.